Virtual Performance project - Guide
Now we are all in isolation due to COVID 19, I am moving forward using video and audio recording processes to create virtual performances and create a valuable feedback process so our musicians can continue to develop their skills and continue to create exciting musical performances together.
So firstly, what is a Virtual Performance?
You have likely seen a whole lot of them going around social media at the moment.
Here is a particularly entertaining one I saw from a Brass Band in the UK.
And here is another I created for ANZAC Day as my own first attempt.
Summary of 9 the Steps
Here are the steps students need to follow to create video and audio recordings.
Each step is covered in more at the bottom of this page.
Step 1: Download the backing track or video
To your watching / listening device.
Step 2: Practice to the backing track or video
With headphones.
Step 3: Setup for Recording your Audio
SPIRE APP for iOS
Smart REcorder APp for Android
If you have a microphone and recording software, go at it.
Otherwise use Spire or Smart Recorder and follow my tutorials
Step 4: Record Your Audio
Record yourself playing along to the backing / conducted track, wearing headphones.
Try and be as in time and in tune as possible and please don’t forget your dynamics.
Step 5: submit to assignment
Upload to your Google Drive, then in your Google Classroom app, submit it to the assignment.
(With correct naming format of course! Piece - Part - Player)
STEP 6: Feedback and Repeat
This is musically the most valuable part of this whole process.
At this point I will give feedback, wether a response to your assignment submission, or maybe as a zoom call with the ensemble or your section.
You will then take all the feedback, along with your own musical judgements of your performance, and record more takes of your audio until we are happy we have captured your best musicality.
Step 7: Setup for recording your Video
Eventually you may end up recording your audio and video at the same time. However, given how steep the learning curve is, it is far more effective to learn these processes separately. Getting great results capturing audio or video, requires a level of familiarity and comfort with the process. It’s hard enough to play our instruments the best we can, without adding all the newness of recording audio and video all at once.
Lighting
Natural Light from the front, no bright windows behind. Simple background that’s not distracting.
Video
1080p HD, 30 fps, H.264
Vertical / Portrait Orientation
AE LOCK
This may get set differently for different projects.
The important thing is that everyone is uploading the same settings, so they can be compiled much more quickly at my end.
Ensure you are facing the camera, not sideways, and your face is well centred both vertically and horizontally.
Step 8: Upload your Video
This process will be much the same as for your Audio recording.
There will likely also be a feedback and repeat process, which may include things like:
“now do a take wearing a themed costume”
or
“now everyone record themselves dancing to the drum solo”
Step 9: Share the result
We need to ensure we are only sharing our video within the constraints of the permission parents have given and following best practice for privacy and child protection. If a video is deemed “share with family and our school community only”, please ensure anyone you share the link with understands not to post it publicly on Social Media.
Each step in more detail
Step 1: Download the Backing Track or Video
For each piece, I will provide something for students to play along with so they are in time and in tune in the final result.
Sometimes this will be a video of me conducting to a backing track, other times it will only be an audio track with beat clicks where needed.

An example from my first attempt at a conducting video and backing track for my musicians to practice along with and then record their part to “How To Train Your Dragon”

An example of how the audio backing tracks look for download on my website.
Download the video or audio to whichever device you will use to watch and listen while doing your recording.
Step 2: Practice to the Backing
Playing to a backing track or video is a very different skill to playing in an ensemble.
For the recording you will also need to be playing with Headphones, which can really throw even highly experienced musicians.
Some instruments may need to hear themselves in the room more than others, so only using one ear with the headphone can really help. Learning the comfortable volume you need the backing at will also take practice.

Practicing my Tuba with headphones to the conducted video backing track.
Step 3: Setup for recording YOUR AUDIO
You will need:
A quiet room, your instruments sounds good in.
Lots of background noise is going to ruin your recording.
At home we don’t usually have a lot of choice about the acoustic spaces we can record in, so just make the most of the best option you have.A source device - to play the backing track / conducted video backing track.
This could be a mobile device, tablet, laptop or desktop computer. Provided you can get it in a good position to be able to watch and listen, and push start and stop as needed, so within arms reach.Headphones - connected to your source device.
Audio capture device - to record your audio.
This could be an iOS or Android mobile device or tablet.
Your laptop or desktop is not going to work well unless you have an external microphone and know how to use recording software.If you have access to a good microphone and audio software, then definitely go ahead and do that.
That is outside the scope of these instructions except to say you can upload the audio file to me separately to the video file.
Don’t add a whole lot of effects to yourself though, as I’ll be doing that when I combine everyones tracks in Logic Pro X.
Your fancy effects will render your audio unusable for our project.
If you don’t have a microphone, then your mobile device or tablet can still capture audio which is definitely good enough for our project.
The built in apps like the video camera and voice memo will not do a good job however.Audio capture app
This is the game changer that is going to let us get a good final product.
I have found an app each for iOS and Android, which let us capture good sound from your devices built in microphone.
iOS - Spire by iZotope
Android - Voice Recorder by SmartMob
I have created tutorials on how to Install, Setup, Sound Check and finally Upload from these two apps.
Please click the relevant app below to be taken to my tutorial.

Spire tutorials
How to install
How to create a Project
How to use “Sound Check”
How to upload to Google Classroom - Google Drive

Smart recorder tutorials
How to install and “Sound Check”
How to upload to Google Classroom - Google Drive
I recommend you try several different placements of the recording device, so see which captures the best sound from your instrument.
Remember to redo the sound check process each time to optimise your dynamic range and prevent distortion.
The other option you can try is Garage Band if you are on an iOS device, but to honest, its a lot more effort to get the same kind of result. Spire is much more user friendly and gets you straight to what you need and recording fast and easy.
More Audio tips coming soon……
4) Record Your Audio
Don’t underestimate how hard it is to play your best in this new environment.
Playing by yourself to a backing track on headphones is a very different skill to playing in the ensemble, with your friends all around you, immersed in the sound all around you. Instruments playing together in the same room interact with each other acoustically, making it easier to match tone and pitch and in some cases like the Tuba, it actually gets more efficient to play and centre your notes when playing with others.
I recommend you set yourself up, and then record around 5 takes in a row, without stopping to listen to the result or analyse yourself. As long as you did a good job in Step 3 in setting up for your recording, the sound will be good. Doing back to back takes will let you adjust to the process and what you are hearing and get comfortable with the process.
The beauty of this process is that you can do as many takes as your endurance and technique will allow. Then you can come back tomorrow and do some more. So the first goal is to get relaxed and comfortable and adjusted enough to be able to capture your best playing without being tense and nervous.
Once you feel you have a take where you played fairly well, have a listen to it right through while watching your music and analysing how well you captured the various musical characteristics such as
rhythm
articulation
pitch and intonation
dynamics
phrasing
tone colour
etc
Step 5: Upload to google Classroom
If this is for one of my ensembles, I will have created a folder in the Google Classroom - Google Drive, which you can upload your recording to.
Note: First - Log in to the google Classroom app
On the device you used to record your audio in.
If you haven’t setup Google Classroom on your device, you’ll find instructions here:
Google Classroom On Your Device
There are step by step instructions for Spire and Smart Recorder on my tutorial pages for those apps.
Spire - iOS Tutorial
Smart Recorder - Android Tutorial
STEP 6: Feedback and Repeat
This is musically the most valuable part of this whole process.
At this point I will give feedback, wether a response to your assignment submission, or maybe as a zoom call with the ensemble or your section.
You will then take all the feedback, along with your own musical judgements of your performance, and record more takes of your audio until we are happy we have captured your best musicality.
Step 7: Setup for recording your Video
Getting a really good result recording video and audio from the same device is very challenging, especially using the technology most young musicians already have at home. It gets even more complicated when you need to be watching a conducted video to play along with.
For some projects the audio and video don’t actually need to be from the same take.
A take is one recorded play through of the piece. Video and Audio recordings are often an edited version of multiple takes.
Using multiple takes will depend on either your ability to mix together the various attempts, or my willingness to commit the time to doing so for you. I’ll be specify individually for each project, if I want you to upload multiple takes.
Video Setup
The internet is full of amazing tutorials and information on how to capture good video. For the purposes of this however, I’m going to focus on the basics with the technology you might have at home. I’m going to assume you will be capture the video from a phone or tablet.
Lighting
Set yourself up with good natural light on your face. A window behind you will often be too bright and make your face hard to see.
A good neutral back ground will also help, in general I feel lighter colours work better, but simple and not distracting is the most important.
Artificial light can work also, so long as it’s not making you look orange or giving your face extreme shadows. The Tuba above is an example of poor artificial lighting. You could spend a lot of money on fancy lighting and video equipment, but for our purposes a really good result can be achieved by choosing your location, angle and background well.
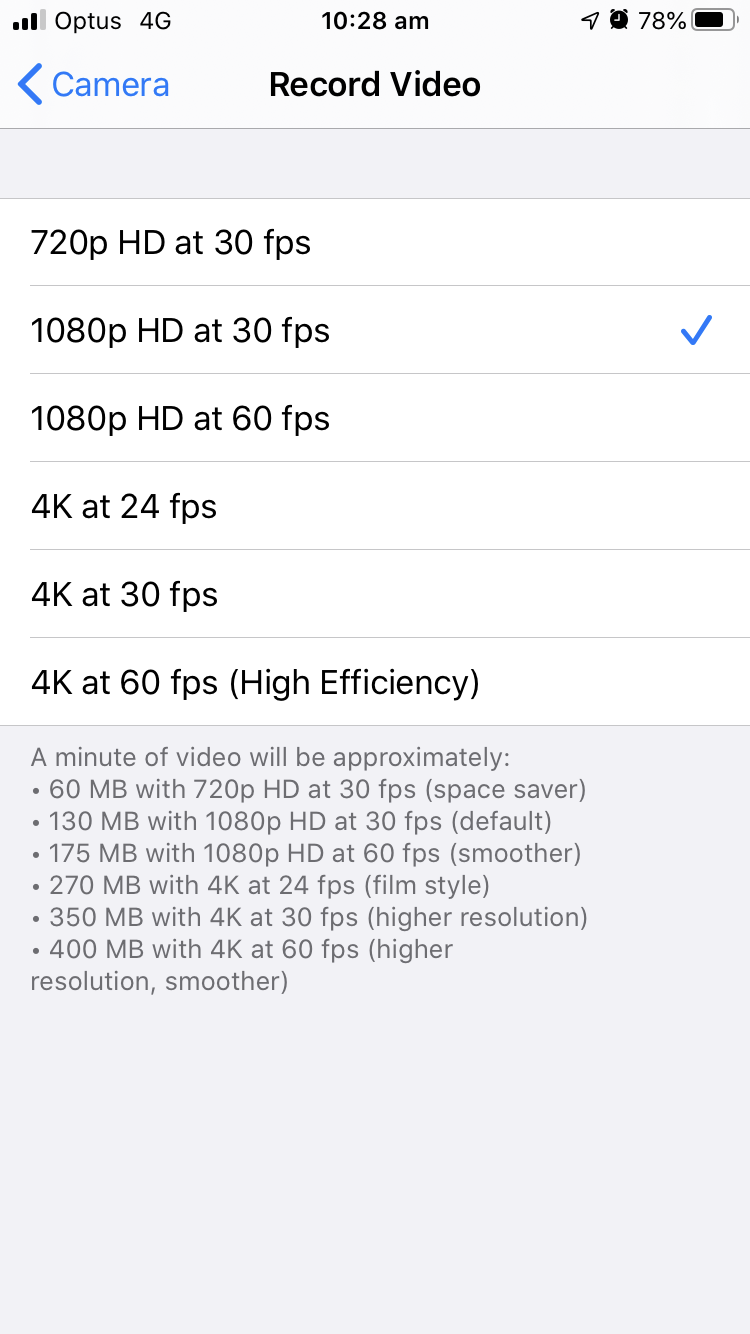
Video Settings
Most tablets and phones have fairly reasonable video cameras these days. In order to get a good video and make it easy for me to edit everyones videos together. I’m going to explain the setting for iOS as thats what I have and use. If you aren’t using an iOS device, see if you can find how to create the same settings, or send me a message and I’ll see if I can help.
1080p HD, 30 fps, H.264
Firstly, go to the main settings in your phone, and in the camera settings turn on grid, set your resolution to 1080 p at 30 fps and choose the “Most Compatible” format.
Here are screen shots so you can see what this looks like in your phone settings.


Vertical / Portrait Orientation
Next, when you go to shoot your video, for most of our instruments the final video grid works better if you shoot your video in the vertical (portrait) not horizontal (landscape) orientation.
With the grid turned on, try and centre your face in the centre grid, and face the camera as if it’s your conductor or audience. This will help you come across better in the final video, which we want to appear as much like a real performance as is possible in this medium.
Have the camera far enough back there is some spare room either side of you. It is easy enough to zoom in on you in editing, but we can’t zoom out beyond the borders of your video.
AE LOCK
While recording video, most devices will constantly adjust the exposure and brightness throughout the video, this can lead to a very uneven result.
If you tap and hold the screen where your face is in the video view before you record, you will see a yellow square around your face and AE LOCK appear in a yellow box at the top. This locks the exposure level to that setting.
This can be tricky to do by yourself, so I’ve found putting one hand in about the position your face will be gives you the arm length you need to lock the exposure and your hand is fairly close to your face in colour that is seems to do the trick. It’s certainly better than leaving the exposure on automatic.

Grid and Framing example, very bad evening inside light though, please forgive the quality
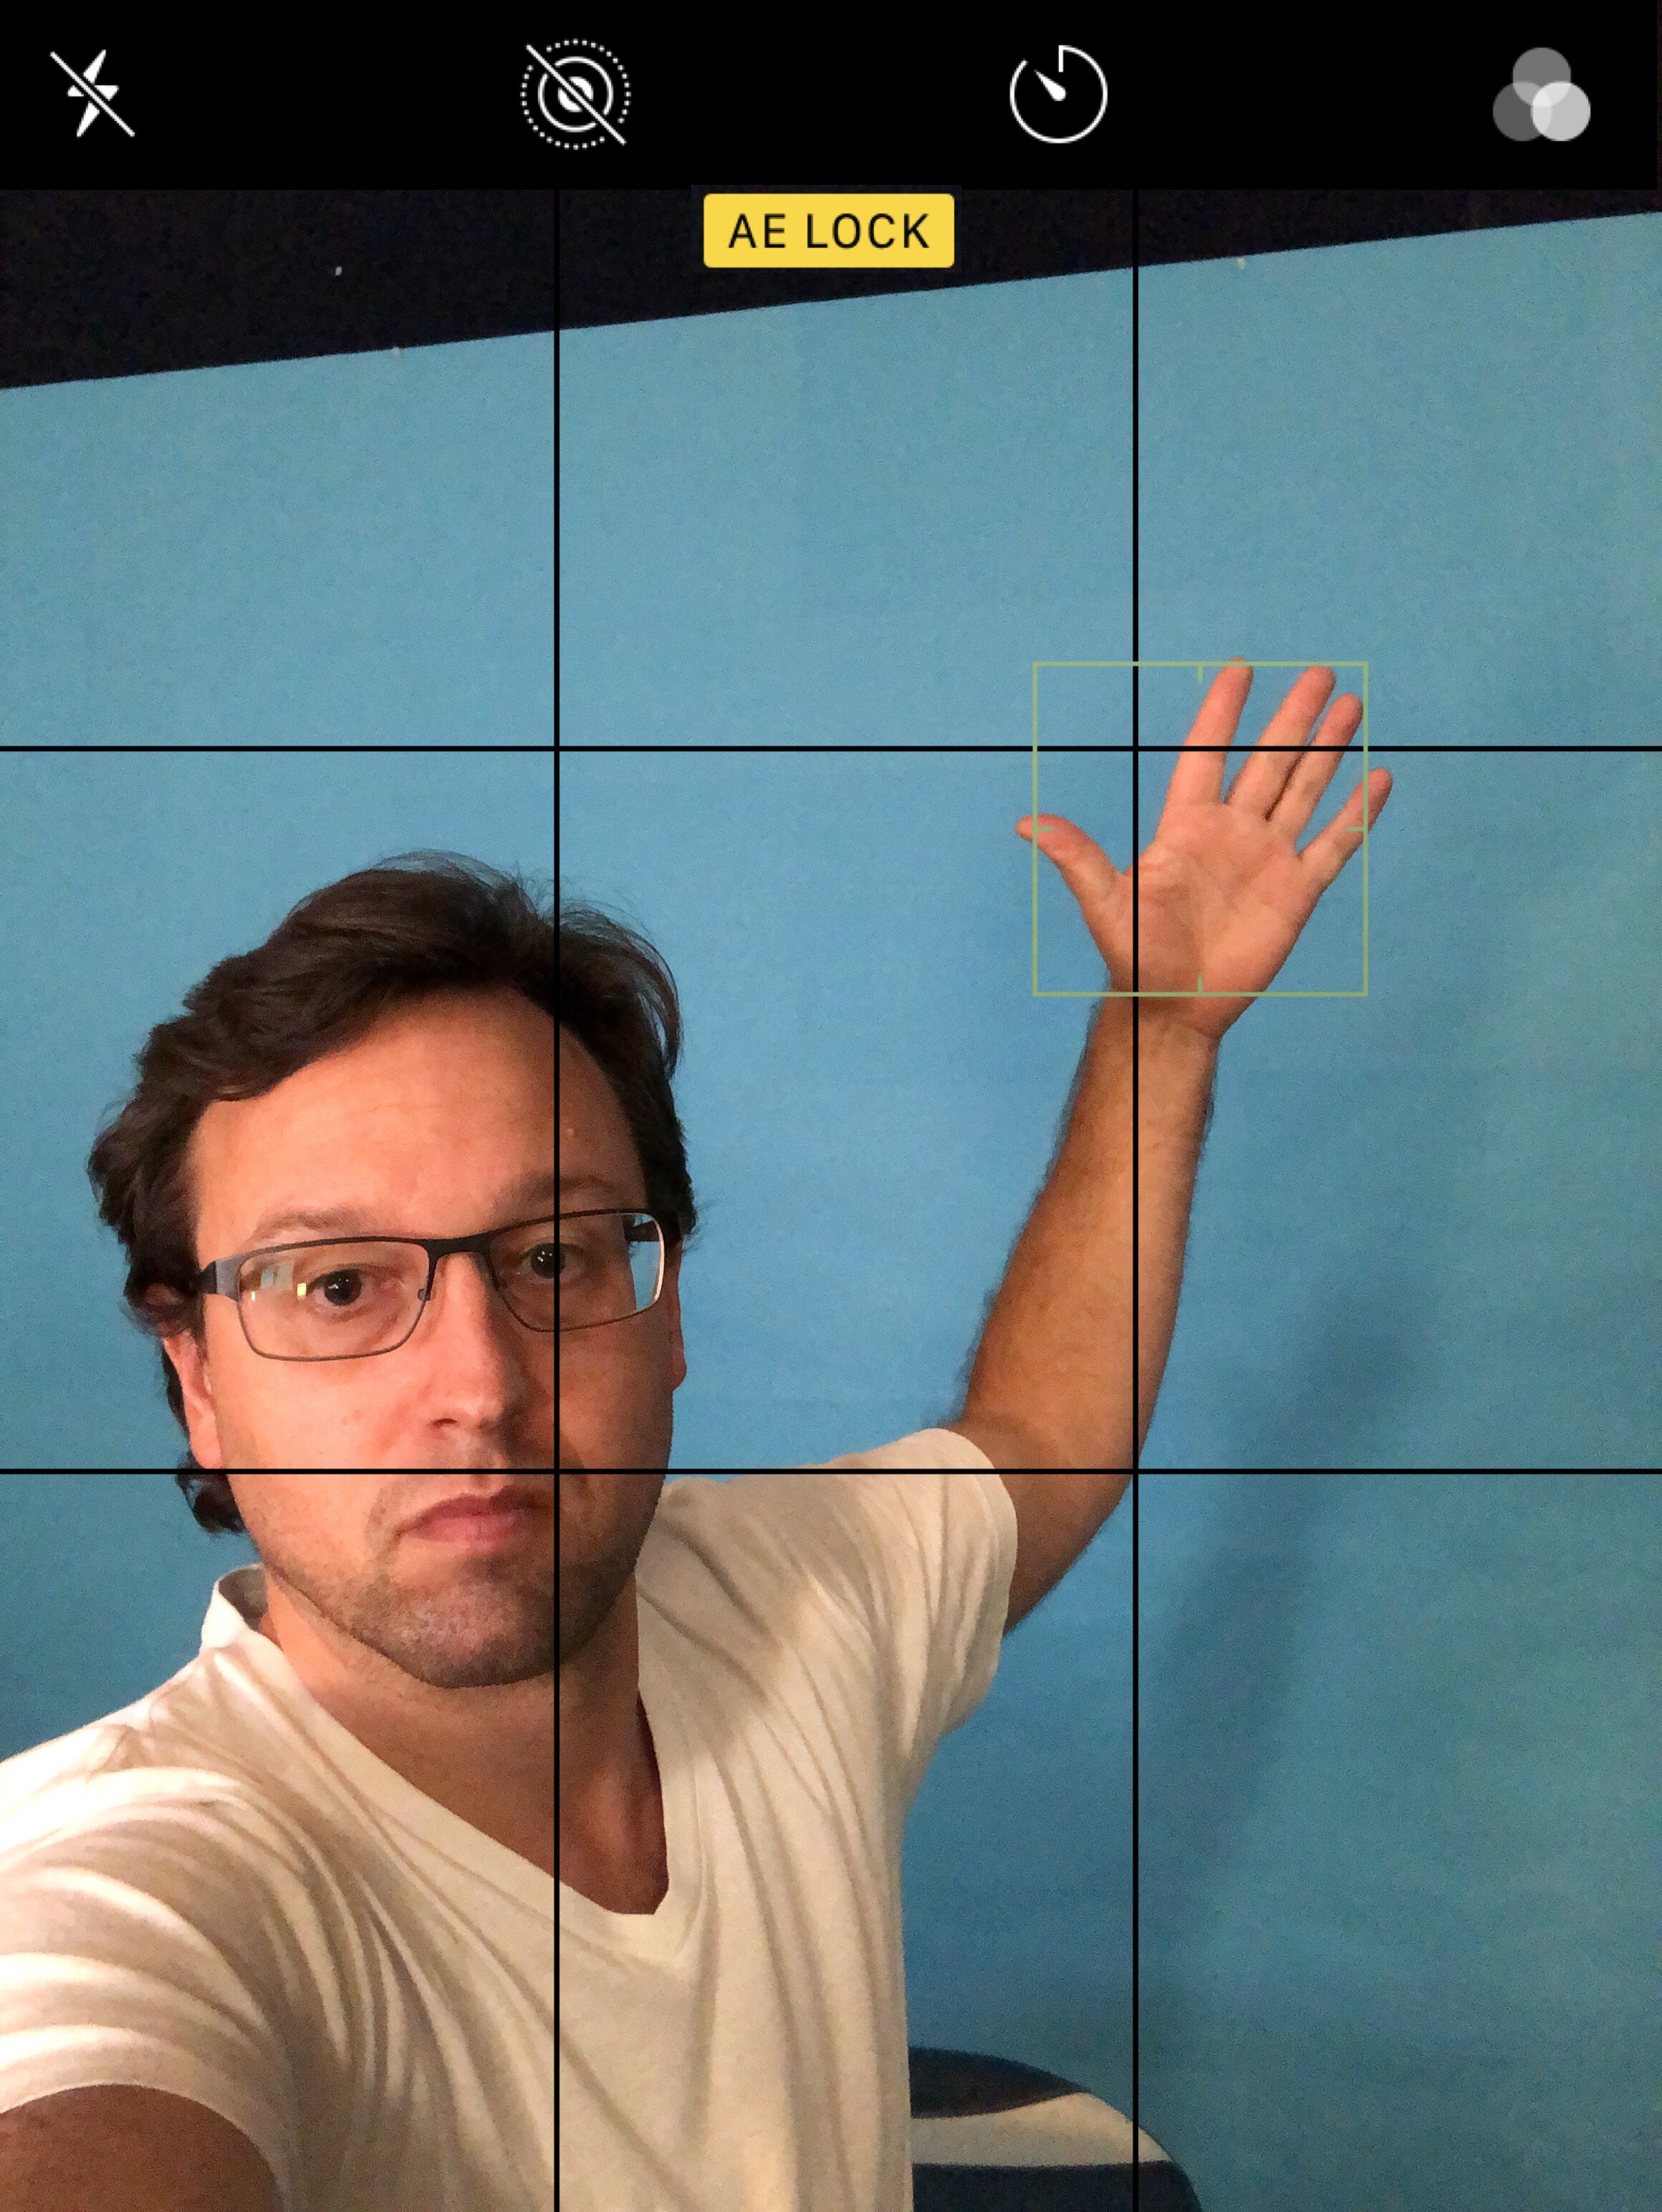
How to set the AE Lock when you don’t have a second person, not ideal, but better than leaving the exposure on Auto. Tap and hold on your hand until the AE LOCK appears.